Please note that the instructions below are for redirecting urls that are on the same domain name.
One of the common tasks that we find ourselves needing to do in DNN ( DotNetNuke ) is a 301 redirect. This is especially common when we have transitioned a company over from an HTML website to the DNN content management system. Typically people accomplish this task by adding a module to the website, but the module overrides the built in url rewriter that is already in DNN 7.1.2 and newer versions, and a lot of the add-on modules are pretty clunky whereas the built in rewriter works really well. Also, many of the add-on modules do not allow you to redirect from urls that have extensions like .php or .html.
We are going to do the redirect by writing it directly into the web.config file. Now, this isn’t exactly rocket science, but it’s pretty rare that non developers know how to do this. It is very important to note that if you mess up the web.config file, you are probably going to take your website down, so make sure to take a backup of the web.config before doing any edits. You also need to note that if you take the website down you will have to upload the backup of the web.config using an ftp client such as FileZilla.
Thankfully you won’t have to learn how to actually write the redirect, you’ll just have to know where to paste it into the web.config. Huge props go out to the guys over at HTMLg for creating this neat little tool to write the redirects for us.
Getting started you will need to know the old url that you want to redirect, and the new url that you want to redirect to. Head on over to ( http://html-online.com/dnn-301-rewrite-rule-generator/ ). It is important that you understand the difference between relative links and absolute links. An absolute link includes the domain name, so an example would be http://www.5stonesmedia.com/blog. A relative link would be when you leave off the actual domain name, so the same example as before would simply be /blog. Relative links only work within the same domain. You will need to use relative links when using this tool.
Lets pretend that we have just transitioned our website from a static html website to a new DNN 7.X website and we have moved all of our blogs over to the new website. Below are our urls for the redirect.
- Old URL – http://www.5stonesmedia.com/blog/catid93/01-07-2006/why-our-company-is-awesome.html
- New URL – http://www.5stonesmedia.com/blog/why-our-company-is-awesome
Once you have generated the code you will need to insert it into the web.config file between the and the <validation> tags.
There are 2 ways to access the web.config file. The first (and recommended) way is by FTP. I’m not going to teach you how to use FTP here as there are many tutorials on the web. A great, free FTP client is FileZilla. I recommend FTP because if you mess things up you can restore the backup you made of your web.config file.
The other way is to edit the file by using the built-in configuration manager in DNN. To access the configuration manager you will need to be logged in as a SuperUser. In the ribbon bar menu hover over “Host”, select the second tab on the left side of the dropdown menu (the one with 2 gears) and then select “Configuration Manager”.
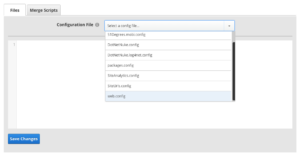
When you get to the Configuration Manager page, select the dropdown menu and select “web.config”.
Now copy the entire web.config file, paste it into your text editor or head over to http://www.editpad.org/, hit ctrl+F and search for </handlers>. The area of your web.config where you need to paste your rewrite code is between the </handlers> and <validation> tags. Paste your redirect code there.
Now copy the entire web.config file that you just modified, make sure to clear the entire contents of your old web.config file out of the Configuration Manager, paste your new web.config file into the Configuration Manager, and select “Save Changes”. The page will refresh and your redirect is in place. Test your redirect and you’re done!


